
Replicating a 19th Century Statue with 21st Century Tech
My first exposure to the world of 3D printing took place in 2009 approximately 500 feet under the Earth’s surface in a former missile silo in the Washington state desert. There, three founders of a new Brooklyn-based 3D printer company hosted a workshop on building a 3D printer kit as part of Toorcamp, a nerdy version of Burning Man. At the end of the kit’s 4-hour assembly we printed out some tiny jewelry boxes. At the time 3D printing seemed to me like a novel technology for hackers with lots of potential, but not one I had any specific use for. Four years later, that use was found.
Museum sculptures are an interesting case in accessibility; they exist in a place the public can access but usually aren’t allowed to touch. Most sculpture materials aren’t too smelly or noisy so that limits the sensory experience to sight. However, not everyone has the ability to see, and although special exemptions are occasionally made to allow the visually impaired to touch some sculptures, you can only feel so much of a large object.
Sight includes the ability to expand the size or detail of what you’re looking at by moving closer or further away from the object. This isn’t possible in the two-dimensional web, so the paradigm of pairing a “thumbnail” image with a full-size counterpart became an established method for having both a high-level and up-close view of things. With similar constraints in mind, we’ve utilized 3D scanning and printing to create a “thumbnail” for large sculptures which can be used as a tactial maps of the object’s entire shape.
So how do you go from marble masterpiece to plastic replica? Like 3D printing, 3D scanning has also recently broken out of the expensive-equipment-for-expensive-professions world and into the much more afforable world of hobbyists and institutions with modest budgets. AutoCAD’s 123D Catch is a free download which was launched last year as a way to create 3D models from photos using stereophotogrammetry, which basically means taking a bunch of photos from different angles and letting software figure out how far away stuff in one photo is from stuff in the next.
The conditions those photos are taken in both in the camera and everything surrounding the subject are pretty unforgiving; out of the first eight attempts I’ve made scanning sculptures, only the double Pegasus ended up looking close to what it was supposed to. From these initial attempts and some research, I was able to narrow down the list of things to scan next by whether they met this criteria:
- Can’t be shiny
- Can’t be or be inside something transparent
- Can’t be wiggly/moving (no scanning museum visitors)
- Must fit in a photo when shot at 30 different angles in a 360 degree radius
- Must be lit under consistent lighting
- Can’t have shadows cast on it when shooting
- Can’t have too many things moving around in the shot (museum visitors indoors, leaves in a windy day outdoors)
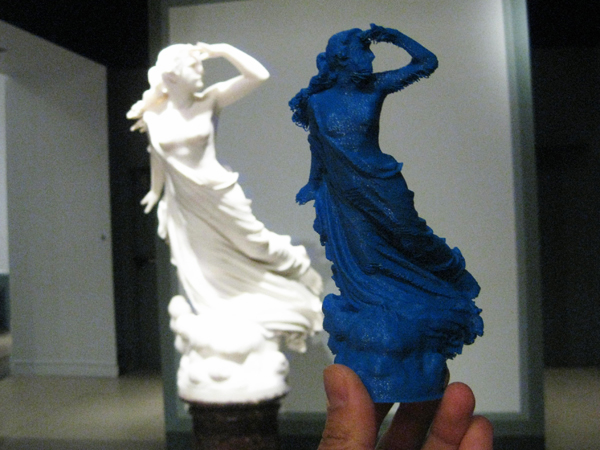
When Rachel recommended Randolph Rogers’s The Lost Pleiad, it so perfectly matched the criteria that I saw myself rendering a perfect model from the first scan. Eleven scanning attempts later, I found out:
- Most cameras try to attempt auto-adjusting exposure when shooting towards a source of light, ruining the scan
- Bright spotlights on bright white marble create a blur between the edge of the object and the background, ruining the scan
- Turning off said spotlights without cranking up a camera’s ISO settings lead to slower shutter releases which lead to blurry images, ruining the scan
- Cameraphones and point-and-shoot cameras don’t have very high ISO settings and I don’t have perfectly steady hands
Scan #11 used a Canon SLR with a manually set white balance, exposure level, and high ISO setting (5000); only auto-focus remained in the camera’s control. Approximately 30 shots in a mostly even perimeter around the statue were taken and re-taken in case if the first take was out of focus along with around 12 overhead shots in a smaller perimeter above and around the statue. After sorting out any blurry photos, the images were uploaded into the Windows version of 123D Catch which shows the angles at which each photo was taken.

Before this is printer-ready, the object had to be cleaned up so that the object has a flat base and doesn’t include stuff in the background picked up by the scan. We used MeshMixer, a free download.
With the texture removed, the remaining mesh looked as though it was melting somewhere that didn’t have gravity with swaths of wall and floor surrounding it (alt+left mouse drag to move around, alt+right mouse drag to zoom in).

I removed floating artifacts is by using the plane cut tool (Edits -> Plane Cut). This was also useful for removing bulges on the surface and slicing a perfectly flat base for the model. The surface of the object was also bumpy and jagged where it should be smooth (arms, torso, etc). The way I solved this was by using the smoothing brush.
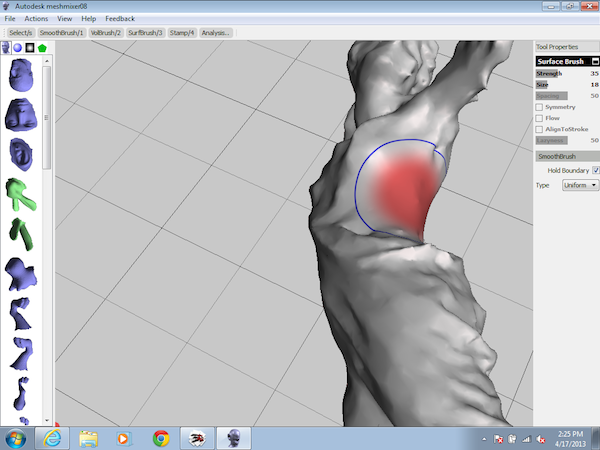
The smoothing brush (Smoothbrush/1) is basically digital sandpaper; For each rough area, I adjusted the size and strength of the brush to match the size and roughness of the surface until it looked more like it’s supposed to. In addition to the removal of defects, the object had to be made “watertight” and have any holes and cracks sealed before being printable.
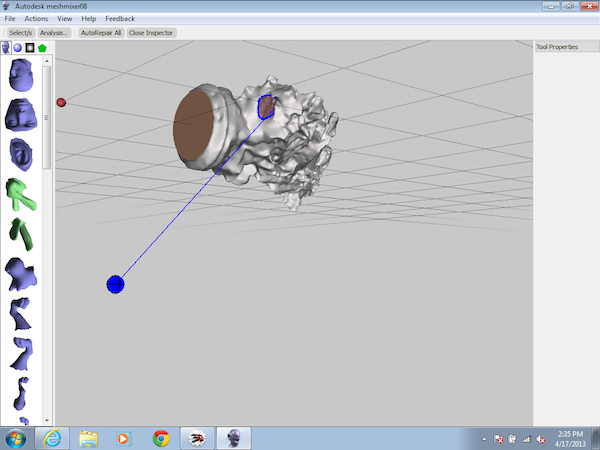
With the inspector tool (Analysis -> Inspector), a floating color-coded sphere pointed to a gap near the bottom of the robe, which was filled by right-clicking the sphere, choosing to smooth the boundary, then left-clicking the sphere.
With the object ready, I exported it as an STL file (File -> Export), a format which most if not all 3D printers can print with. For the printer we use at the Brooklyn Museum (3D Systems Cube v2), the STL file needed to be processed using their Cube Software, also a free download. Using that, I imported the STL file and clicked Heal to double-check the model’s watertightness. Since the model itself was fairly small, I also used the Orient & Scale tool to make it 260% bigger. In Settings, I removed the raft (the Cube uses a special glue that makes printing a platform raft unnecessary) and also removed supports since most of the statue probably wouldn’t need them. Finally, I centered it with the Center icon and hit Build. For simplicity, I built the final .cube file to a USB drive that I could just plug into the printer.
The printer’s on-screen menu has incredibly clear and simple step-by-step directions on how to print, so I won’t repeat them here. Five hours later, the print was completed and looked close enough to be a handheld tactical map of the real McCoy, with only minor amount of overhanging plastic extrusion in areas near the bottom of the robe and under the raised arm.
BONUS: We’re also releasing the STL files under a Creative Commons license for both the Double Pegasus and The Lost Pleiad which you can download and print on your own 3D printer:
Download Double Pegasus (CC-BY 3.0) on Thingiverse
Download The Lost Pleiad (CC-BY 3.0) on Thingiverse
